How to use the bulk upload feature to easily upload products on your online store

Ecommerce


157 week ago — 10 min read
Are you an online store owner? Or aspiring to be one? Once you create your free eStore on UnionBank GlobalLinker’s Linker.store you can skip past the tedious activity of uploading each product individually.
Instead of doing a manual upload of one product at a time, which is extremely time consuming, you can use our Bulk Upload feature. It is quick and convenient.
Here is a step-by-step guide on how to bulk upload your products.
First, ensure you have completed your store setup. If you had trouble with that, click here for a detailed guide to setup your store for free.
STEP 1
Log in to your UnionBank GlobalLinker account.

STEP 2
Click on the Online Store button at the top menu bar. You will see a dropdown bar. Click on Manage Store to open up your Seller Panel.
STEP 3
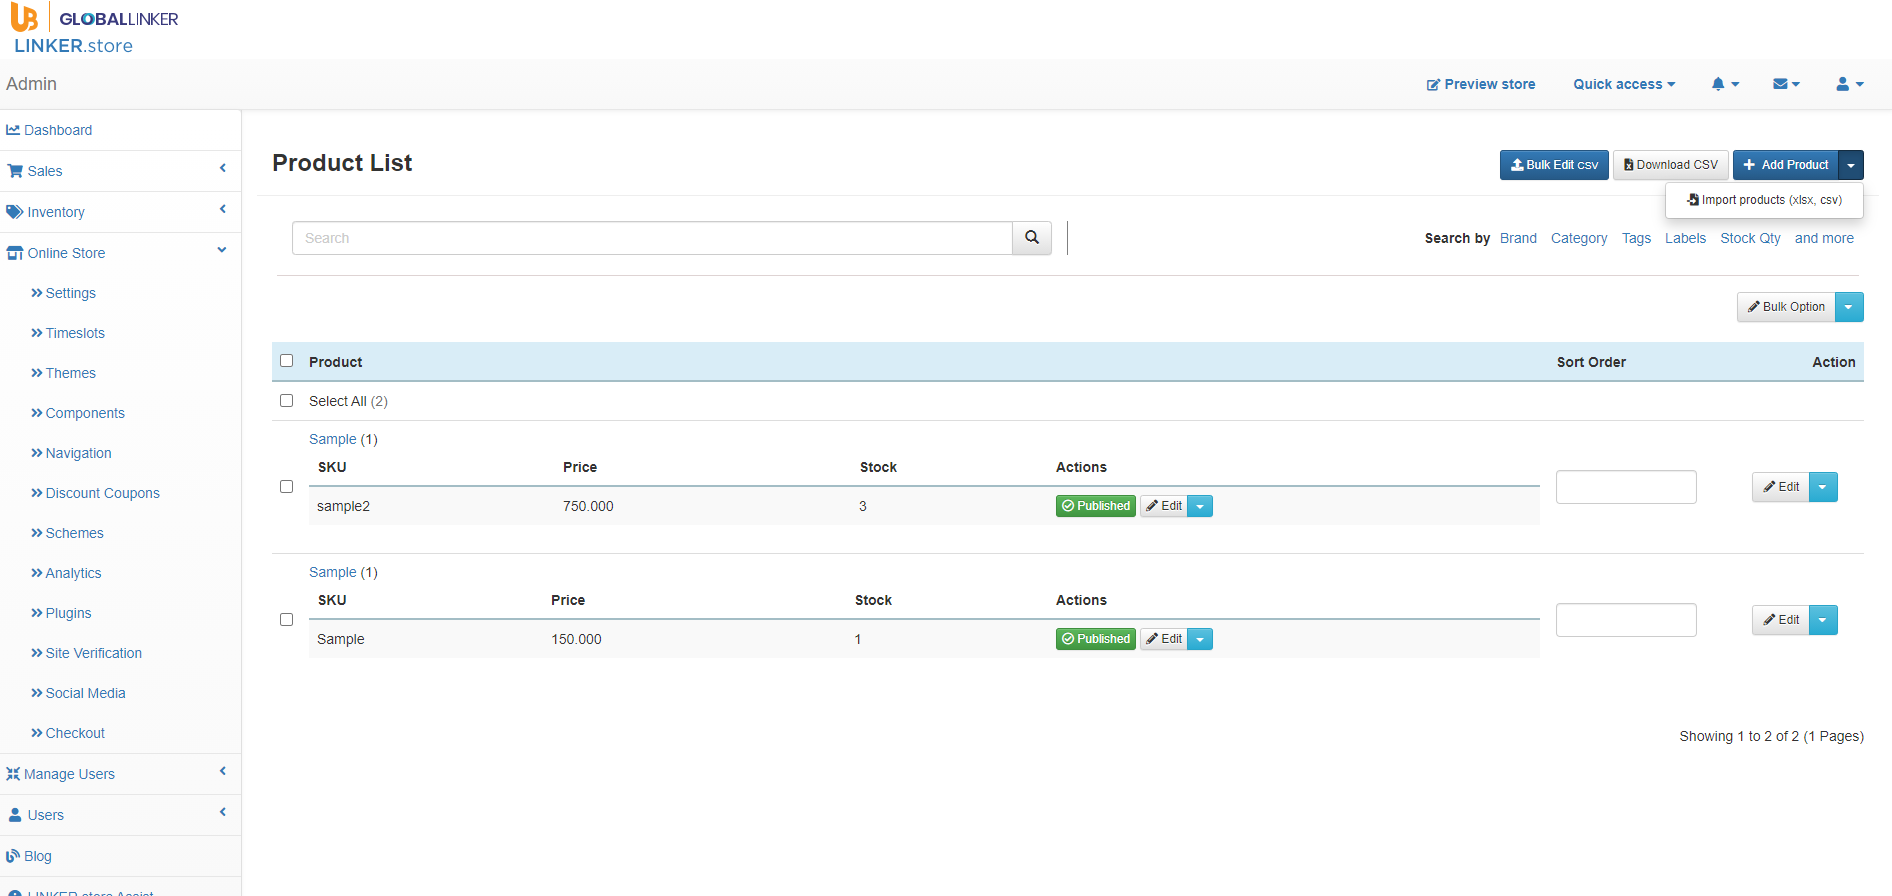
Once you are on your Seller Panel, on the left bar, click on Inventory > Products. On the top right of your main screen, you will see an Add Product button. Click on the arrow next to it. From the drop down, click on Import Products
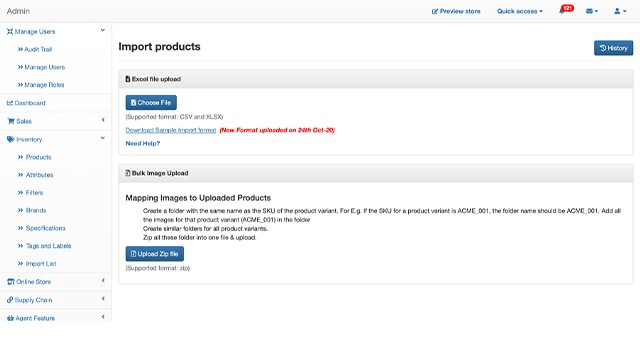
STEP 4
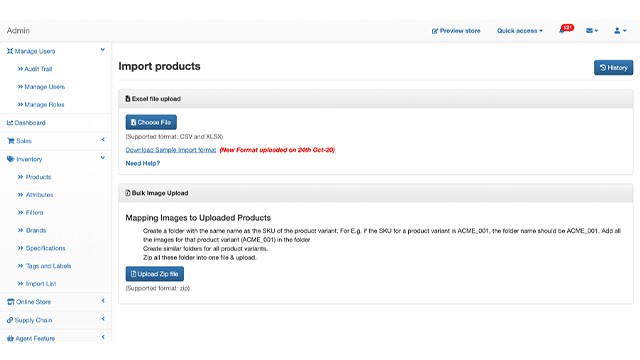
Under Excel file upload, click on Download the Sample Import Format.
Note: Every time you want to update your inventory, download the format from your seller panel, don’t use the old one. This is because we keep updating the format from time to time to suit our member’s requirements and make the platform better. Remember this is to avoid any technical issues.
STEP 5
Open the downloaded file. You will see a sheet with pre-created columns and some sample products added for better understanding. Based on the fields explained below, add all your products to this excel sheet.
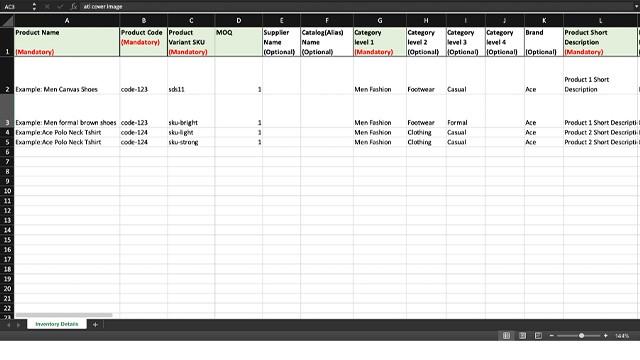
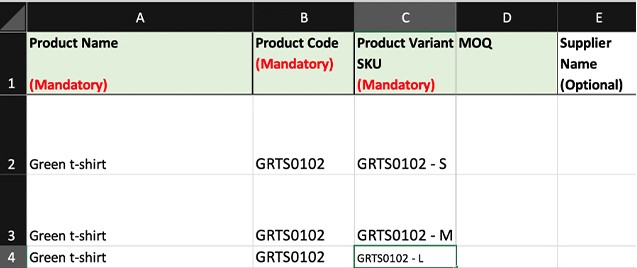
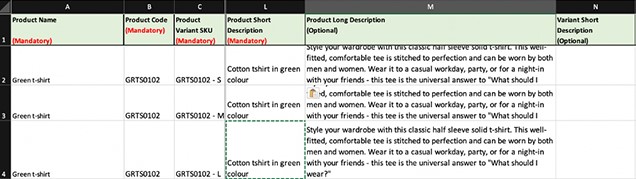
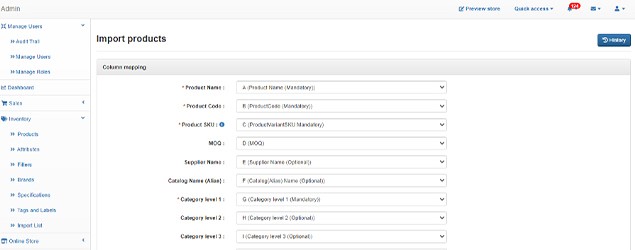
Product Name: Add your product name in this field.
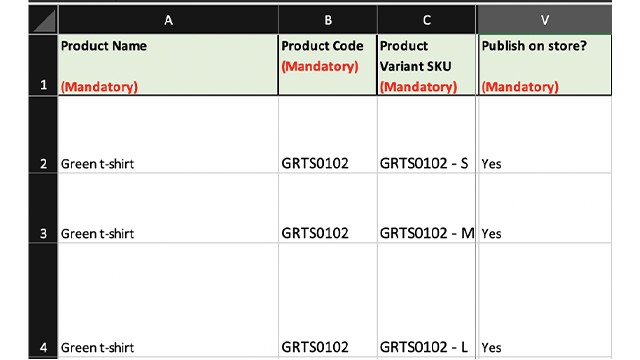
Product Code: Product code is used to identify products with variants so that the system can capture all the different variants available for that product.
Add each variant in a different row, but with the same product code, The Product Code is a mandatory field.
E.g., If a product named ‘green t-shirt’ has a product code GRTS0102, it will be repeated across each size variant of the green t-shirt.
Product Variant SKU: Each SKU should be unique If you already have an inventory management system, you can use your own SKU code or create one.
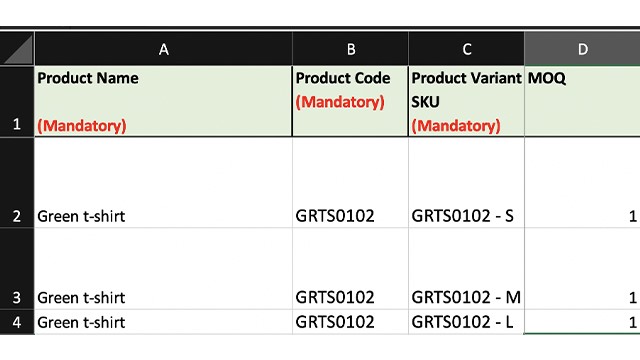
MOQ: This stands for Minimum Order Quantity and is the minimum number of that product the customer can order. If the customer doesn’t buy the MOQ of a product you set, then the order will not be generated. MOQ is generally used for bulk orders.
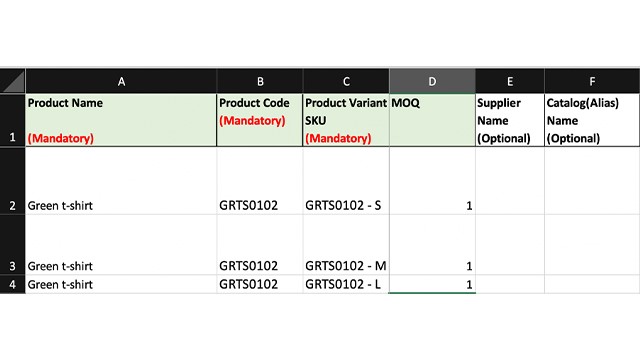
Supplier Name and Catalog: This is for internal reference; it is not shown on your online store.
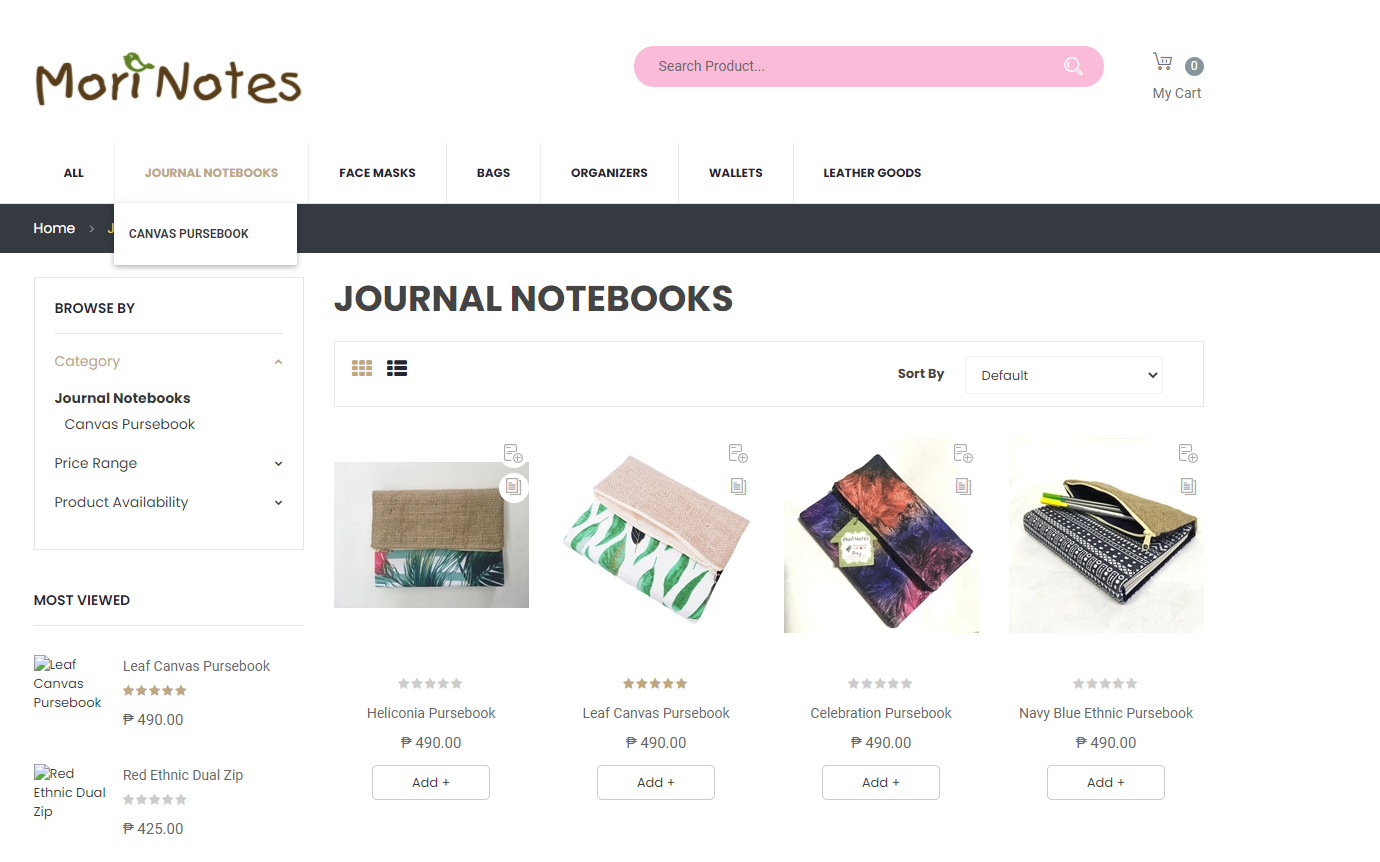
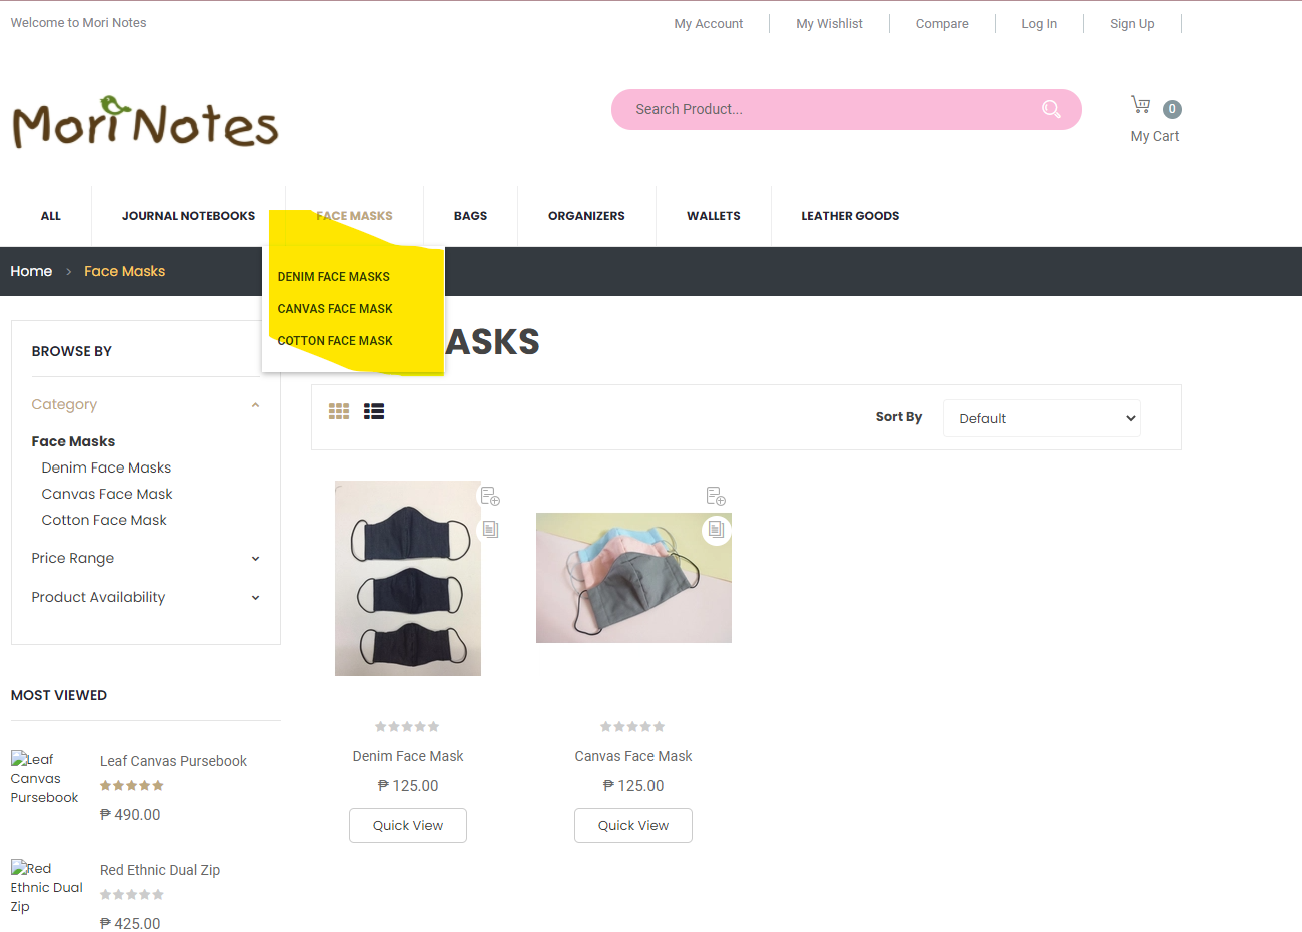
Category & Brand: Categories help you segregate your products and make it easier for your customers to browse through your online store. Here in the below image; there is the first category called JOURNAL NOTEBOOKS with CANVAS PURSEBOOKS.
Note: In case your product category doesn’t already exist, any new category you add to the excel file you upload, will automatically get created. Avoid typos in the category names. For example, if the existing category name on the platform is ‘T-Shirt’ and in the excel file you add ‘T-shirt’, a new category will get created as one has a Capital S and one has a small.
The drop-down highlighted in yellow below indicates the level 2 category.
Description: There are three types of descriptions: short, long, and variant. In the short description, briefly describe the product with a few bullet points about its features, benefits, or specifications.
Typically, long descriptions are used to share more information about the product, such as specifications or technical information tables, health benefits details, etc.
You can also use HTML code on the excel file. The system will upload it properly.
The variant short description is used when the product description or summary changes with the variants.
Note: The formatting of the texted which is added to the content in the description column will not reflect as it is, hence, it advisable that you generate an HTML code for content and add it in the description column. To generate HTML code for content, you can use https://wordhtml.com/ wherein one section you can copy-paste the text with formatting, and from the next section, you can get the HTML code of the same.
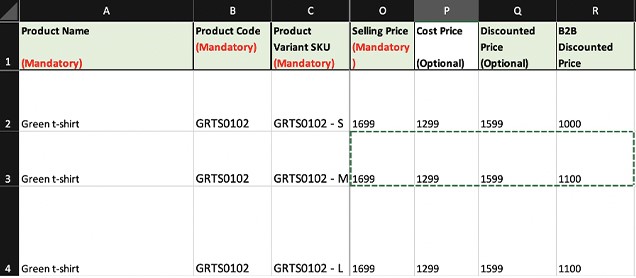
Price: Selling price is the MRP of the product; cost price is for internal purposes only and is not displayed to customers. The discounted price is the price at which you want to sell the product to your customer. The B2B discounted price is for bulk or wholesale customers.
Stock, Shipping Time & Product Condition: Stock is the quantity of that product available in your warehouse; this helps you keep track of your inventory.
The shipping time is the time you need to get the order ready for shipment. It is not the delivery time; it is your internal processing time.
The product condition is to enter whether the product is new, used, or refurbished.
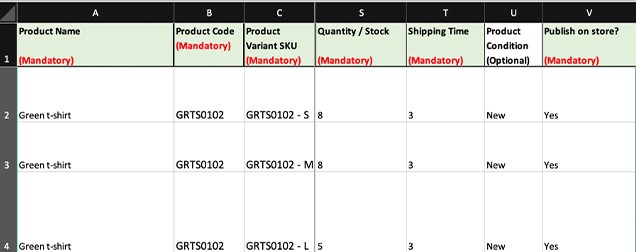
Publish on the store: In this column, you define whether the products should be published on your eStore or not. If you want to show the product to the customer immediately after it is uploaded, then type YES. If you just want to upload the product for now and display it at a later stage, type NO.
Package Dimensions: This is used to calculate the shipping fee. If you don’t have this information handy, you can add it later.
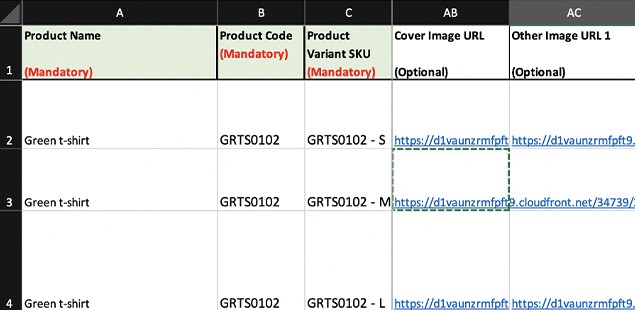
Images: Product images can be uploaded in two ways. The easiest way is to use third-party websites to generate a direct image URL and add the URL to the excel sheet.
The second way is to create individual folders for each SKU, add product images to the folder, and then zip them before uploading. In case you are uploading more than one folder, add all the folders into one folder and then zip it instead of zipping all the folders individually.
Note: If you are uploading products using the URL method, images will start appearing a few minutes after product upload is completed.
If you are using the zip file method for images, first upload the excel sheet and only then upload the zip files.
Pro tip: The URL method is reasonably fast and time-saving.
Meta Title, Meta Description, and Meta Keywords: These are used for SEO purposes for better ranking of your online store.
Meta Title: The title of the page. It should be less than 60 characters
Meta Description: The description of the page. It is displayed on the search page; therefore, it should be drafted diligently. It cannot be more than 180 characters.
Meta Keywords: Meta keywords are used to improve your page rank on search engines, you must add 6 to 10 keywords separated with commas. It is better to use unique keywords that will help your business stand out.

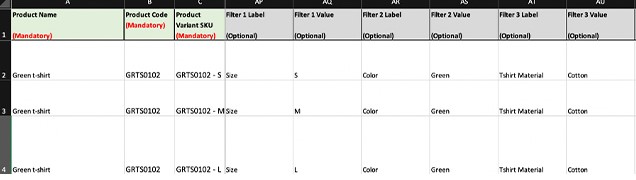
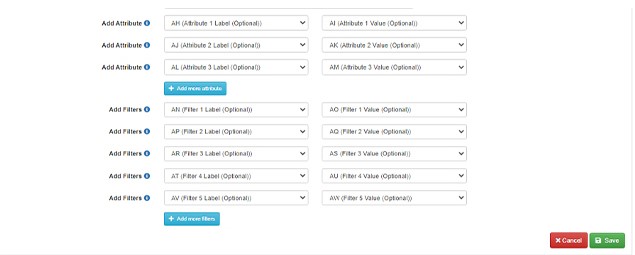
Attributes Labels and Values: Attributes are used to define the variants of complex products.
Attribute Label: Attribute labels are based on the variation of the product, in the sense of size, color, weight, RAM, Storage, etc. For example, a T-Shirt will be available in different sizes, then the attribute label is “size.” Similarly, if there were different colors, it would be colors
Attribute Value: It is used to define the corresponding value of the variant; continuing with our example of T-Shirt, the Attribute values will be Small, Medium, Large, Extra Large, etc.
Images for Product Variants: If you have separate images for product variants, then please add the images for the respective variant SKUs, now you need to add the SKU codes, Selling price and Stock.

Filters: Filters help to make your customer’s product discovery journey shorter and easier. It enables the customer to find exactly what they are searching for. It is always better to have as many filters as possible.
Pro Tip: Don’t add filters that are too technical.
STEP 6
Now that your excel file is all filled up and ready to upload; save the file, go to your Seller Panel, click on Inventory > products. On the top right side, click on the arrow next to Add Products. and click on the Import Products (xsls, csv) dropdown.
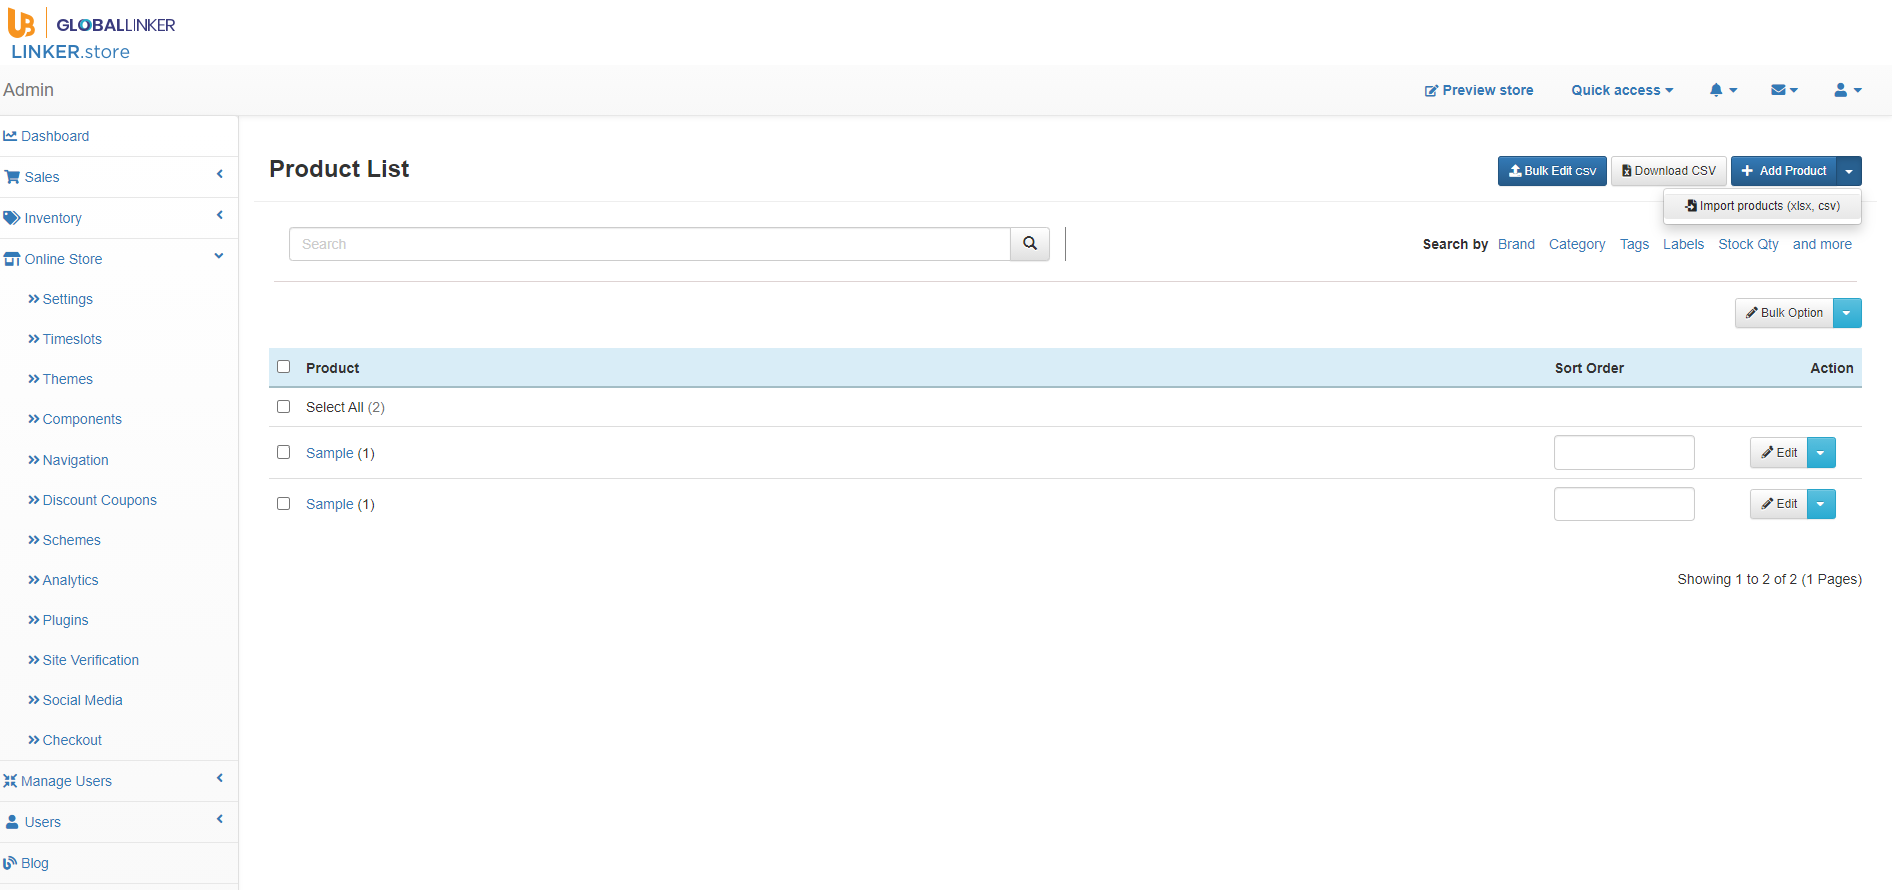
STEP 7
On the Import Products page, click on Choose File, select the excel file, and upload it.
STEP 8
A new page will open where the mapping of the excel sheet and system is shown. Please review it to ensure all the columns are perfectly mapped. Click on Save. Your import will now start.
It might take some time for the products to upload. There is a loading lag between the uploading process and reflection on the front end of the store so don’t worry if you don’t see your products live as soon as the upload is over.
You are now done. Start selling and grow your business with UnionBank GlobalLinker!
For further assistance, write to us at ‘info@linker.store’
View GlobalLinker 's profile


Most read this week

Comments
Please login or Register to join the discussion