How to process and ship orders on your Linker.store

Ecommerce


221 week ago — 5 min read
Order processing is one of the most critical links for the smooth functioning of an online store. This is because customer expectations of the speed of order fulfilment are on the rise. To simplify your order processing, UnionBank GloblalLinker’s eCommerce platform - Linker.store comes with pre-integrated logistics partners.
In this guide, we will walk you through how to prepare your orders for your logistics partner. But first, ensure you have completed your store setup, activate shipping, and create shipping zones.
Steps to process and ship orders
STEP 1
Login to your UnionBank GlobalLinker account.
STEP 2
Click on the Online Store on the menu button at the top. Click on Manage Store.
STEP 3
Open your Seller Panel, and on the left bar, click on Sales > Orders.

STEP 4
Scroll down to see the orders you’ve received and click on View to see the order details.

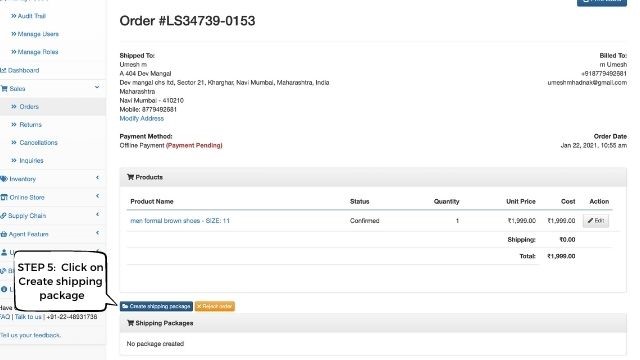
STEP 5
Once you click on view, you will see the order details as such the shipping address, products ordered, mode of payment, etc. To ship via the logistics partner, click on Create shipping package.
STEP 6
A Create Package pop up will open. Here, under the Select logistics drop-down, select your preferred courier partner for this order. To know more about activating logistics and selecting our courier partner, click here.
In cases when you have to ship a number of products that don’t fit in your usual packaging box, you will have to create multiple packages and shipments for one order. Read below for more details.
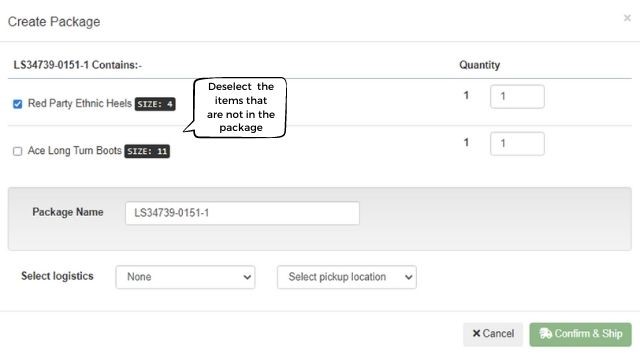
Create multiple packages & shipments for an order
You can package and ship larger orders in two or more boxes. In this scenario, ensure you generate multiple shipments for the same order, through your seller panel. This will generate different Air waybill tracking numbers (AWB) which are unique labels that can be scanned to track your packages and ensure they reach your customer in time.
To create multiple shipments, deselect items that are not within the same box or package, in the Create Package pop-up box, before you click on the Confirm & Ship button. Create individual shipments for the items in the subsequent boxes. To create individual shipments, you need to follow the same process, but deselect the items that are not in the package.
The below image shows how only the product that has been shipped can be tracked. Each time a shipment is created for a single product or group of products, you will be able to track the deliveries.

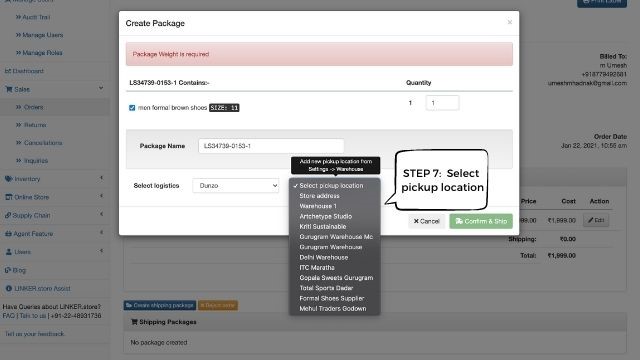
STEP 7
Next, click on the Select pick-up location drop-down and choose the warehouse location that the selected order should be picked up from.
To learn how to add a warehouse, scroll down.
Adding a warehouse
It is essential to add your warehouse or multiple warehouses’ details so the logistics partner knows where to pick up your orders from.
To add a warehouse, go to Online store > Settings and click on Courier > Warehouse.
Click on the Add Warehouse button.

Enter your warehouse address details and click on Save.
Note: Your store address is added as your default warehouse location
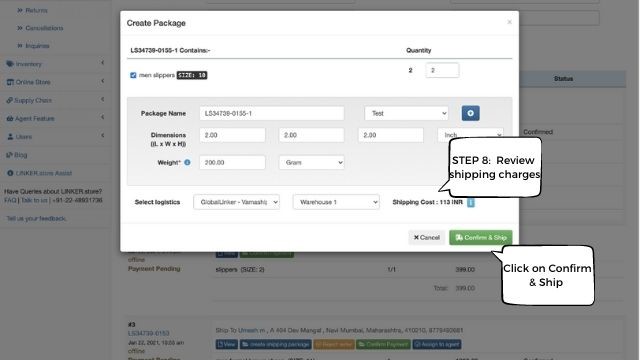
STEP 8
Once you have selected the pickup location, the next step is to confirm your shipment after reviewing the shipping charges. Click on Confirm & Ship; this will pass the shipment details to the courier partner, and the pick-up will be scheduled as per the standard timelines.
STEP 9
After the shipment is placed, when you click on the View button under that order, you will see an option to Print label and Print Manifest. A manifest is one of the key documents used in the process of shipping. It is simply a list of all lading* or airway bills issued for cargo loaded in a specific ship.
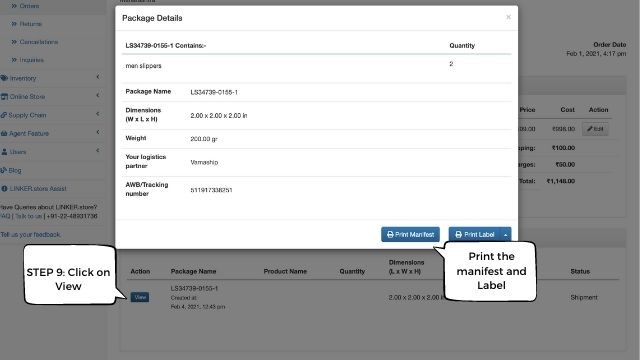
Once your order is packed, stick the label on the package's outer flat portion from where the courier can easily scan it. Keep the manifest document ready at the time of pickup, as it needs to be signed by the courier, which will be considered proof of pickup.
Note: Hyperlocal shipments will not require Labels and Manifests as the order is delivered locally.
Ensure the product is packed well to sustain transit shocks and pressures.
*A bill of lading is a legal document issued by a carrier to a shipper that details the type, quantity, and destination of the goods being carried.
For further assistance, write to us at ‘info@linker.store
View GlobalLinker 's profile
Other articles written by GlobalLinker Staff


It’s a match: How to find the right business partner
125 week ago
Most read this week

Comments
Share this content
Please login or Register to join the discussion